
Updated 1/6/2012
Go to end of tutorial for the updates!
You will know I've updated by this tutorial by the "Update" above. I keep adding things to it when someone emails me that they are having a hard time or simply cannot do something on their blog they would like to do and can't figure it out. Plus Blogger is ever changing. I'll put the update at the very end so to view a "new technique" go to the very end and it'll be there.
~*~
Since we have so many wanting to know how to blog and what to do I'm putting up this tutorial for you to look at. There are screenshots of just about everything you'll use. Some of the page elements you probably won't and might be a bit more advanced so I'll just stick to the ones most of us use.
First of all you get a blog so I'm assuming you've already done that. Blogger is by far the easiest. I tried Typepad and it was truly more difficult.
There are pictures, text and graphics along the sides of most blogs. Some are on the left and some on the right. It doesn't matter which side it is because the way to add them is still the same.
On your blog up in the right hand corner you will see your "log in" name, New Post, Customize and Sign Out. New post is for you to quickly add a new post to your blog.
One very important thing: every single time you change something you will click "add item" or whatever it says and THEN YOU WILL CLICK SAVE! Some things just have SAVE so just click that, but some have ADD and SAVE so be sure and click BOTH.
All explanations are above the screenshots. Yes, you ALL have the ability to make screenshots, not just Macs - which I'm on.
~*~
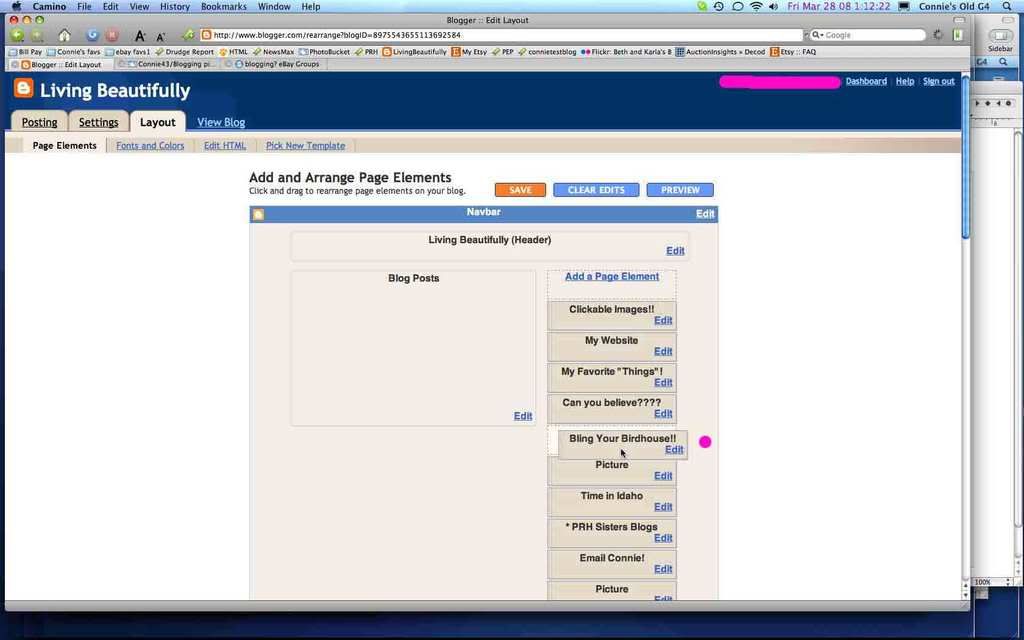
This is what you will see when you click Customize>Configure Header. I added an image from my computer. The Blog Title I just put in Living Beautifully. The Blog Description is in that little box HOWEVER, you do not want that if you are putting in a graphic!! Where it says "Placement" put your tick mark in the Instead of title and description. Otherwise you'll have writing over your graphic! So just click on the "bubble" which I call putting in a tick mark. Click "save changes" and you're done. Changing a graphic in your header is the same thing. Just remove the one image and add another. Also I want you to realize that you can move each and every "page element" around on your blog as per the 2nd screenshot below. I'm numbering the screenshots.
Go to end of tutorial for the updates!
You will know I've updated by this tutorial by the "Update" above. I keep adding things to it when someone emails me that they are having a hard time or simply cannot do something on their blog they would like to do and can't figure it out. Plus Blogger is ever changing. I'll put the update at the very end so to view a "new technique" go to the very end and it'll be there.
~*~
Since we have so many wanting to know how to blog and what to do I'm putting up this tutorial for you to look at. There are screenshots of just about everything you'll use. Some of the page elements you probably won't and might be a bit more advanced so I'll just stick to the ones most of us use.
First of all you get a blog so I'm assuming you've already done that. Blogger is by far the easiest. I tried Typepad and it was truly more difficult.
There are pictures, text and graphics along the sides of most blogs. Some are on the left and some on the right. It doesn't matter which side it is because the way to add them is still the same.
On your blog up in the right hand corner you will see your "log in" name, New Post, Customize and Sign Out. New post is for you to quickly add a new post to your blog.
One very important thing: every single time you change something you will click "add item" or whatever it says and THEN YOU WILL CLICK SAVE! Some things just have SAVE so just click that, but some have ADD and SAVE so be sure and click BOTH.
All explanations are above the screenshots. Yes, you ALL have the ability to make screenshots, not just Macs - which I'm on.
~*~
This is what you will see when you click Customize>Configure Header. I added an image from my computer. The Blog Title I just put in Living Beautifully. The Blog Description is in that little box HOWEVER, you do not want that if you are putting in a graphic!! Where it says "Placement" put your tick mark in the Instead of title and description. Otherwise you'll have writing over your graphic! So just click on the "bubble" which I call putting in a tick mark. Click "save changes" and you're done. Changing a graphic in your header is the same thing. Just remove the one image and add another. Also I want you to realize that you can move each and every "page element" around on your blog as per the 2nd screenshot below. I'm numbering the screenshots.
Screenshot #1

~*~
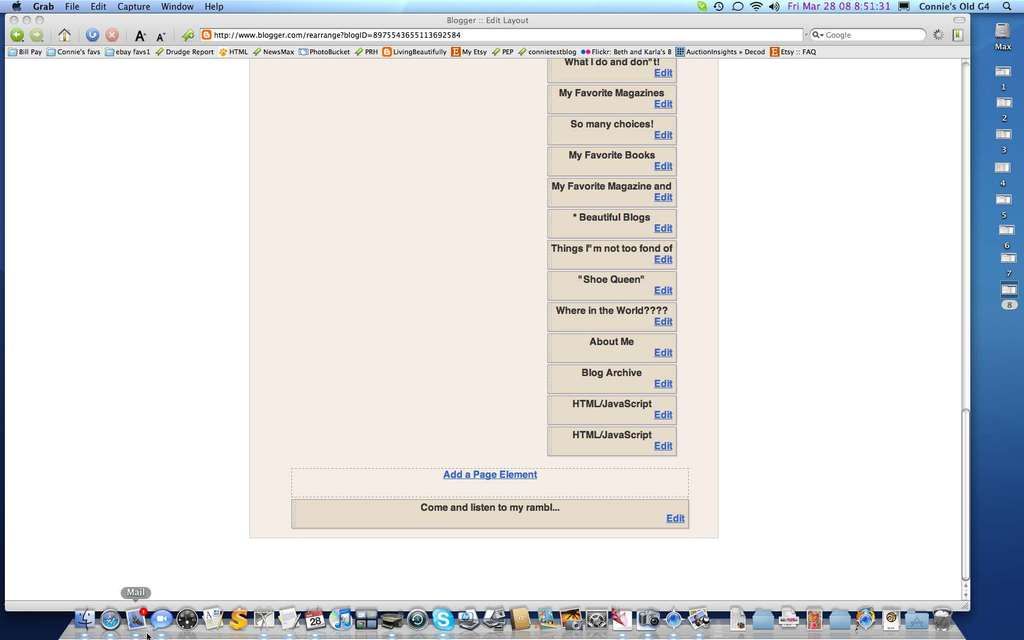
See the little pink dot........just put your cursor on what you want to move and MOVE it around till you have it the way you want. This can be done over and over and over and over again....get it!
Screenshot #2
~*~
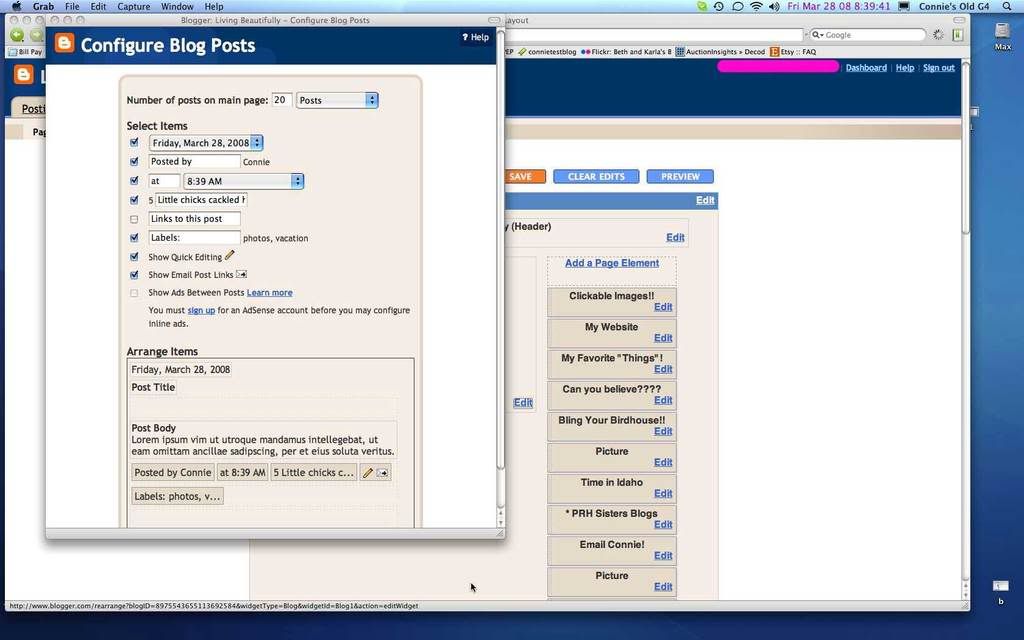
You can also Configure Blog Posts. It doesn't have to say just "comments." You can change it to say anything you want. I've put in "little chicks cackled here today" but you can say "my friends stopped by to comment" or "sweet ladies" or whatever you want. You can set how you want the time to show or how many posts you want per page. I have 20 posts set per page. If you have a lot of pictures and they are large it will take forever for a dial up customer to view it. I ALWAYS ALWAYS take dial up customers into consideration. Yes, there still are people out there who cannot get high speed for one reason or another. You want as many people viewing your blog as you can get.
Screenshot #3
Screenshot #3
~*~
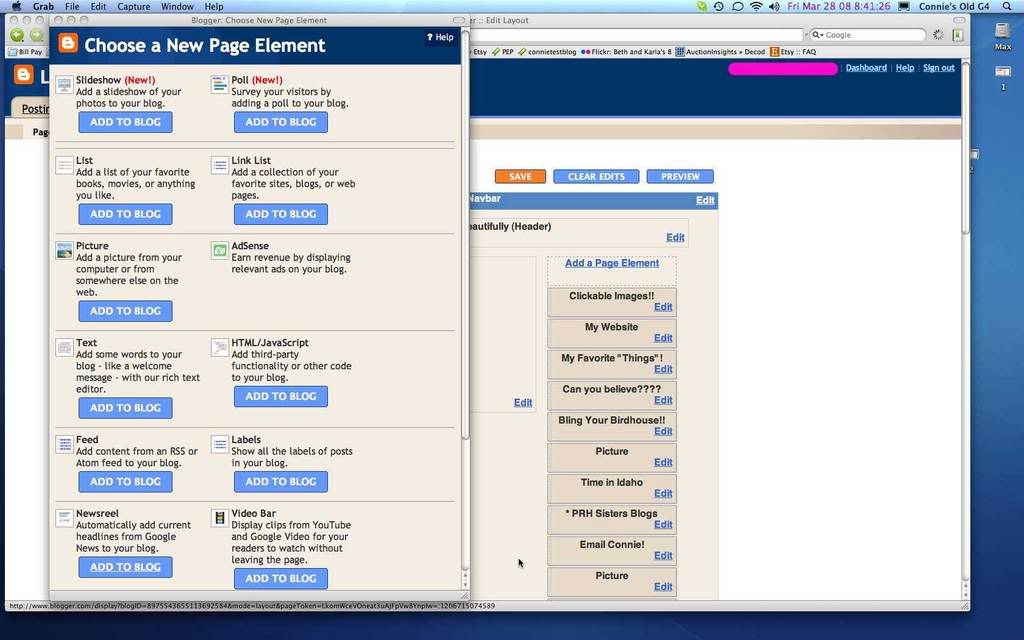
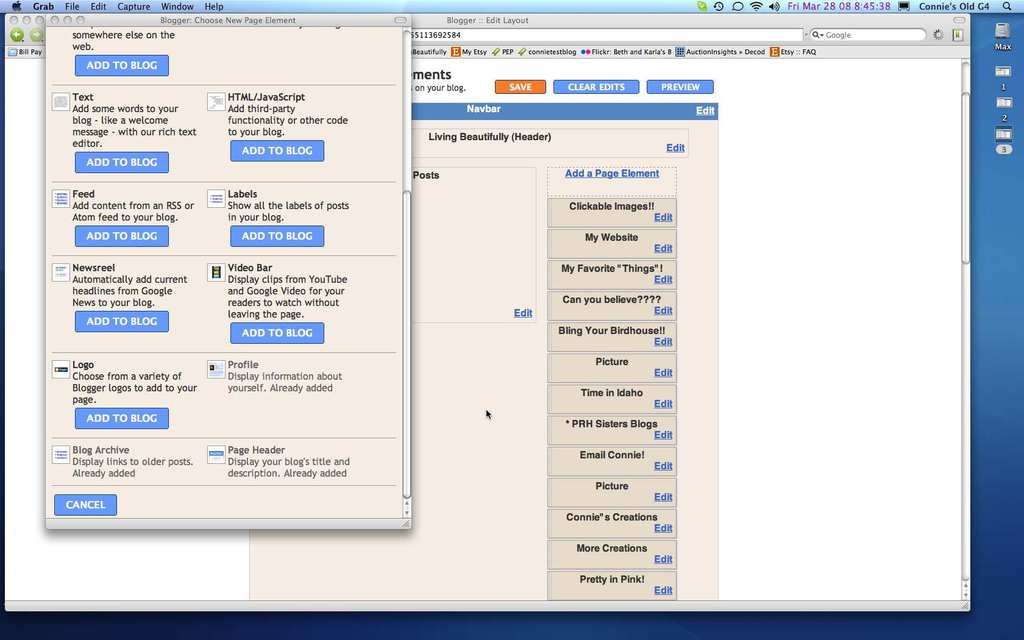
When you click "Add a Page Element" this window pops up. You will most likely never use Slideshow, Poll, AdSense, Feed, Labels, Newsreel or Video Bar. DO NOT use slideshow for your flickr, PB slideshows, etc. Flickr is done when you use a badge from flickr and put it in HTML/Javascript. So is PB slideshow. I'll explain later.
Screenshot #4
Screenshot #4
This is just a continuation of the screenshot above. Couldn't get it all in one shot.
Screenshot #5
~*~
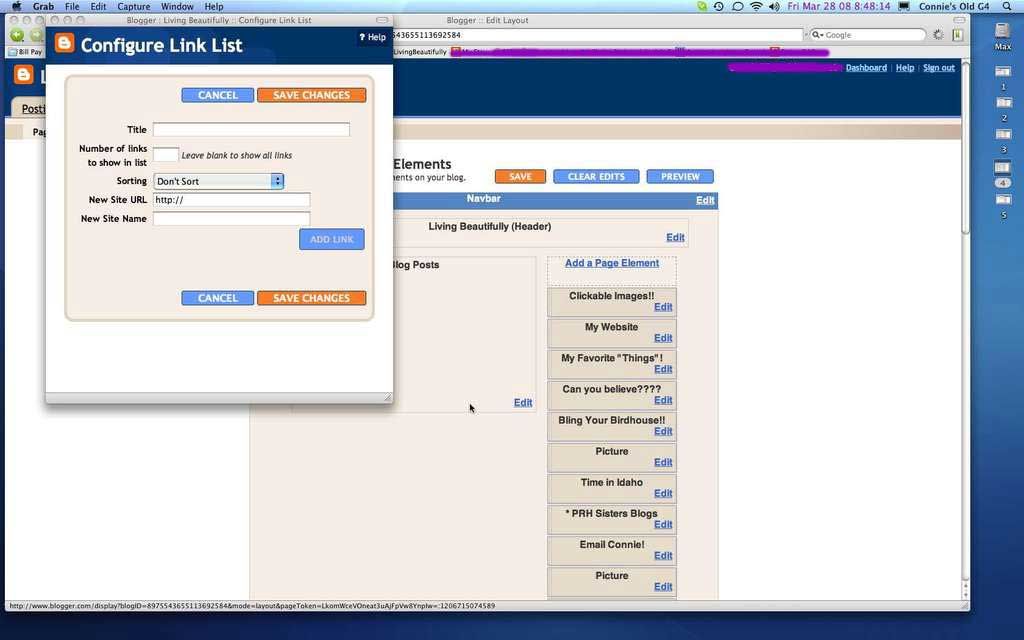
Configure Link List is where you'll add a list of anything you want to link to - say all the other favorite bloggers. You'll give it a title - say My Favorite Blogs or something "catchy" like that. :) Leave Number of links blank. I'd sort them alphabetically. That is much easier for people to follow - alphabetically. It is your choice however. I alphabetize for me. I'm easy to confuse!!! Then in New Site URL you will put in the url of the site you want to link to - say mine would be http://connie-livingbeautifully.blogspot.com If you still don't know what a URL is then that is it! But I would hope by now you'd know!! If you have 2 http in there it will not be correct and will not show. Usually the http is highlighted and when you add the one you want it deletes the highlighted http and puts your correct URL in but if there is a problem and it doesn't show go back and edit and see if that might be the problem. Again each time you add a person's URL click "ADD LINK" and then "SAVE CHANGES!!"
Screenshot #6
Screenshot #6
~*~
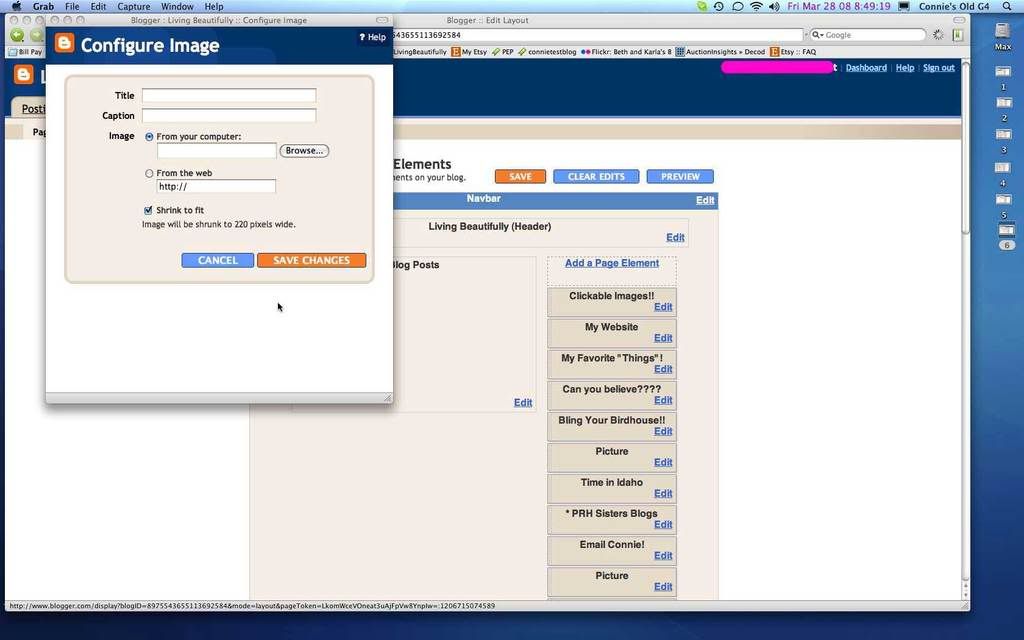
Adding an image/GRAPHIC!! is this little window. You can add it from Photobucket or any image host OR your computer. Just make sure you have the correct selection with your "tick mark" in it. Click on the bubble! Make sure you have "Shrink to fit" checked. I always give them a title: Connie's favorite rose, Someone tagged me today, Can you believe??? - taking a look at my blog will explain a lot of this. But I'm a nut about correctness and "eye candy" and that's exactly what all the images on the sides are: eye candy! I love it.
Screenshot #7
Screenshot #7
~*~
We're now coming to the hardest one for just about anyone to understand but it truly is simple! Very very simple. You will use this one for slideshows because flickr badges, PB slideshows go in here and they do the work for you! You just copy and paste the HTML or Javascript (2 different programming languages) and voilà, that's it! Again, give it a title (actually some of the page elements won't let you do anything unless you have a title in that little slot so it's good practice to just give everything a title - all the stuff on the sides, I mean. Okay say that you want to add flickr slideshow, go there and make a "badge" - what they call it and as you do it you'll have certain "easy" choices to make and at the end they give you the code to insert here in the large window called "content." Just add that here and click save changes and refresh your page and it'll show up. If flickr gives you a problem it would probably be easier to just email me if you need help - or anyone that has the badge actually. I'm sure anyone would be happy to help you.
Screenshot #8
Screenshot #8
~*~
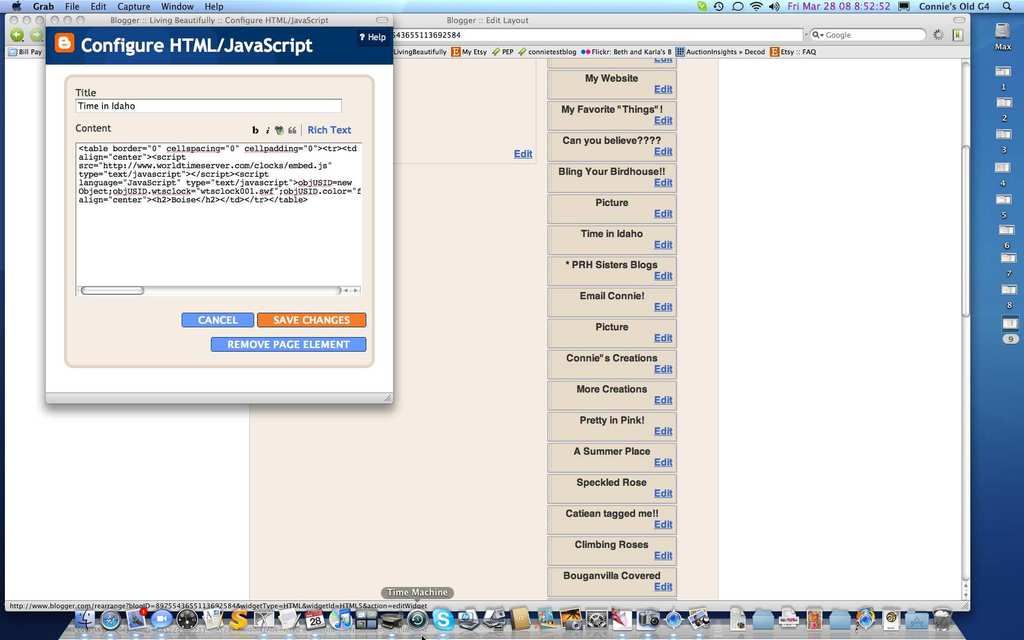
This is what my little pink clocks html looks like. As you can see the clock site did all the work for me. I just copied and pasted it in here:
Screenshot #9
Screenshot #9
~*~
This next one you don't have to use at all. The one down at the bottom. You could put some catchy phrase or "declaration" in there or whatever you want but it should be text. Leave it blank if you want. I just want to use everything they give me!
Screenshot #10
Screenshot #10
~*~
Now we come to what you'll be using 99.9% of the time after your blog has all the "eye candy" up on it.......and I wanna see "eye candy", chickadees!! Unless of course you just absolutely hate it, but why do you think people are going to come to your blog?!?! Hmmmmm....!!!???
Explanation of colored dots.
*pink is where you will bold or italicize whatever you want to.
*light blue is where you'll choose the color of your font. I like colors but if you want black that's fine. But please make it readable for viewers. White text on black background is extremely hard to read. Remember, books are black type on white paper! Just make sure viewers can read the font in the color you choose.
*green is where you'll add a link - more about that below... it gives most people the biggest problem
*darker blue is where you'll add your pix.... about that later.
Screenshot #11
~*~
When you are bolding or italicizing a word or phrase you must "highlight" just that word or phrase and hit bold and/or italicize. Easy
Linking gives more people a headache! But once you know how to do it, it's easy. Have I said this before?? Well, it is!!!
Now, if I want to put a post on there where someone gave me a gift (a swap maybe) and then link to her then here's what I'd do. (That's why they call it a link and it looks like a chain link!) Two ways to do it.
1. Type out the entire post first putting her name in there. Then go back and highlight her name, click on the chain "link" icon and a drop down menu comes up and tells you to enter her URL. Put it in there. Remember when it comes up it will have http:// in there so you can copy her URL and paste it into there or just type it in. Up to you. When I do it I always use Tabbed Browsing, which most browser have now, so I'm going back and forth between each tab - copying and pasting. Again just be sure and make sure there is only one http:// in there. If you start typing or paste it into there you're safe to assume that if the drop down window's http:// will just disappear when you type or paste. If this doesn't make sense, just try it and see if it's incorrect after you post. Anything ANYTHING you do can be corrected! ANYTHING! So do NOT be afraid to be adventurous. Trust me when I say we all make mistakes in the beginning.
2.The other way to do it and be very careful because this has caused some frustration to many women. As you are typing and you come to the name you want to put in and be a link for others to just click on to go view her blog, type her name and space bar and THEN click on the chain "link" icon to make her name a link. If you don't do that - hit the space bar - everything after that will be a link - pictures and everything. Now, you don't want someone clicking to enlarge your picture and being linked to her!!! You want them to see your enlarged picture. So make sure you hit the space bar after you type the name!!!!
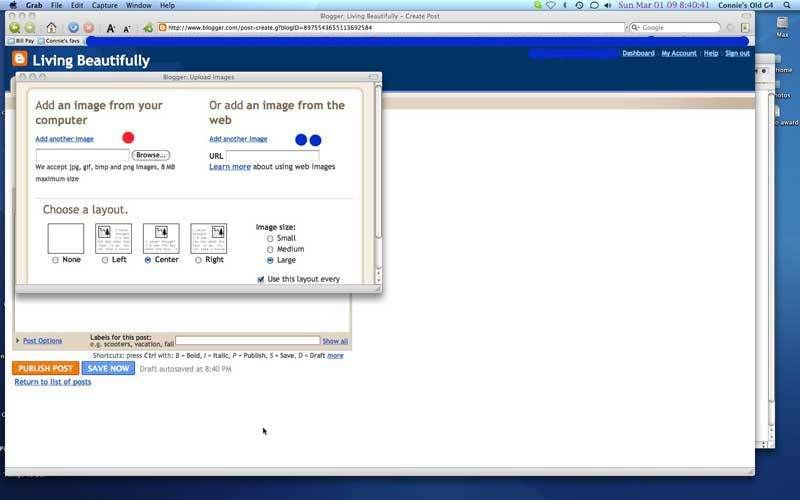
You have a choice of placing pictures to left, center or right. I prefer centering mine. It's MY personal choice. How you do it is up to you, BUT let me remind you again that you are doing this to viewed by others and to make it easy for them to read. So once you select how you want them I think it is best to be "consistent" with the pictures. When you post your first blog post and bring up the icon for pictures it will look like the screenshot in #12. On that down in the right hand bottom corner it asks you "Use this layout every time" (see pink dot) and you check it if you want to use that specific layout each time with your photos. Again, your choice, but I recommend using the same layout every time - consistency. Easier to read and absolutely easier for you to do each time. That way your photos aren't spread all over the place with the viewer having to guess what comment/text you are writing goes with what picture. Doesn't matter if you describe photo at top or bottom of photo, just be consistent so as to not confuse reader.
Screenshot#12
Linking gives more people a headache! But once you know how to do it, it's easy. Have I said this before?? Well, it is!!!
Now, if I want to put a post on there where someone gave me a gift (a swap maybe) and then link to her then here's what I'd do. (That's why they call it a link and it looks like a chain link!) Two ways to do it.
1. Type out the entire post first putting her name in there. Then go back and highlight her name, click on the chain "link" icon and a drop down menu comes up and tells you to enter her URL. Put it in there. Remember when it comes up it will have http:// in there so you can copy her URL and paste it into there or just type it in. Up to you. When I do it I always use Tabbed Browsing, which most browser have now, so I'm going back and forth between each tab - copying and pasting. Again just be sure and make sure there is only one http:// in there. If you start typing or paste it into there you're safe to assume that if the drop down window's http:// will just disappear when you type or paste. If this doesn't make sense, just try it and see if it's incorrect after you post. Anything ANYTHING you do can be corrected! ANYTHING! So do NOT be afraid to be adventurous. Trust me when I say we all make mistakes in the beginning.
2.The other way to do it and be very careful because this has caused some frustration to many women. As you are typing and you come to the name you want to put in and be a link for others to just click on to go view her blog, type her name and space bar and THEN click on the chain "link" icon to make her name a link. If you don't do that - hit the space bar - everything after that will be a link - pictures and everything. Now, you don't want someone clicking to enlarge your picture and being linked to her!!! You want them to see your enlarged picture. So make sure you hit the space bar after you type the name!!!!
You have a choice of placing pictures to left, center or right. I prefer centering mine. It's MY personal choice. How you do it is up to you, BUT let me remind you again that you are doing this to viewed by others and to make it easy for them to read. So once you select how you want them I think it is best to be "consistent" with the pictures. When you post your first blog post and bring up the icon for pictures it will look like the screenshot in #12. On that down in the right hand bottom corner it asks you "Use this layout every time" (see pink dot) and you check it if you want to use that specific layout each time with your photos. Again, your choice, but I recommend using the same layout every time - consistency. Easier to read and absolutely easier for you to do each time. That way your photos aren't spread all over the place with the viewer having to guess what comment/text you are writing goes with what picture. Doesn't matter if you describe photo at top or bottom of photo, just be consistent so as to not confuse reader.
Screenshot#12
~*~
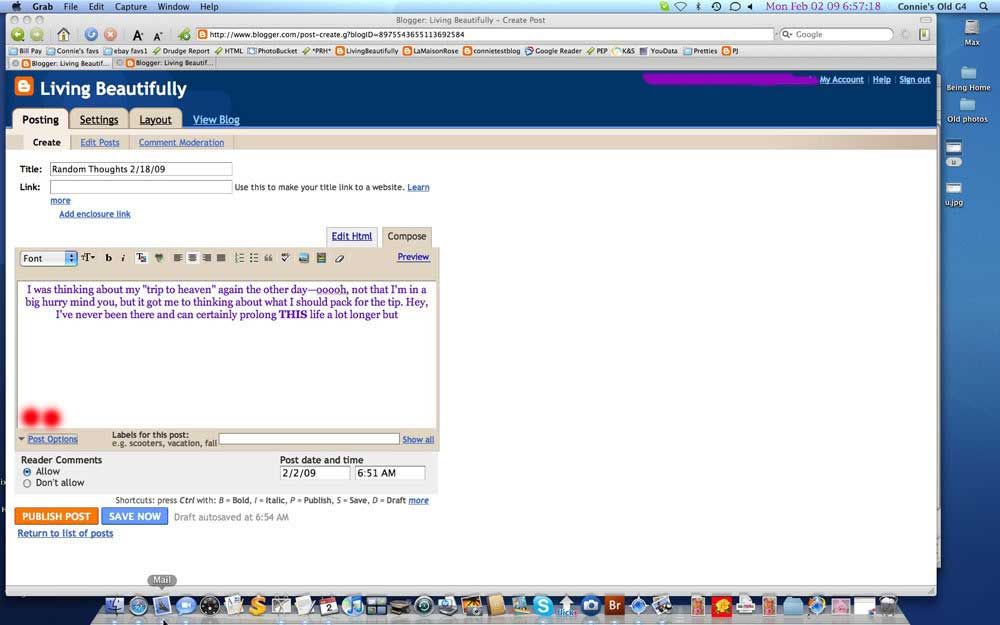
One last thing that a LOT of people don't know about is "scheduling" your posts to appear in the future. I do this because sometimes I'm simply too busy to do it on some days but if I have a day when I have not much to do then I'll sit down and schedule several of them for future dates. This is sooooo simple to do!
First you make your blog post and before publishing it you click down in the very bottom LEFT corner where it says "Post Options" (I've put 2 little red dots there for you to see) and click on the little arrow for those "options." You'll see 2 little windows that have a date and a time. You enter the day you want it to appear and the time you want it to appear. I always start mine to appear on the blog at 12:01 AM. Just like that: 12:01 AM because if it isn't right a little red warning will appear and you'll need to correct it. Don't worry it isn't that frightening, just follow the instructions. But the date must also be correct. Put it in just as you see mine below don't use 02/02/2009; use 2/2/09 or 2/15/09. (Hope this is clear.) However, if you don't do it properly then it'll let you know. At this point you only have a "draft" not a "published" post. And listen/read carefully, because until you click "Publish" it isn't "published"!! You must click "Publish" for it to BE published on the date you select. I cannot tell you how many women have emailed me saying their post didn't publish on the day they wanted it and it was because they DID NOT hit "Publish" after scheduling it. Now, and this is very, very important: If you should schedule it for say 4/5/2009 and go in and change something you need to hit PUBLISH again or it won't include any changes you've put in there. This also applies IF YOU CHANGE THE DATE SAY FROM 4/5/2009 TO ANY OTHER DATE!!! Make sure you hit publish AGAIN after ANY changes to the blog or the date!!! You can schedule it for any future date you wish: tomorrow, Christmas, easter of next year or you could schedule it for a month down the line or just whenever. You can schedule as many as you want. Say you're going to be on vacation for 2 weeks or a month, well, you can schedule 14, 15 or even 30 to be published on different days while you're sunning on a beach in Puerto Vallarta. That simple, chicks. Try it and see how you like it.
Screenshot #13
I think that pretty much covers the basics. If anyone has a question just ask me for specifics that aren't making sense to you. Before you know it you'll be blogging with the best of them!
~*~
3/2/2009 Update
There are a couple of other things I didn't put in earlier that are definitely worth mentioning.
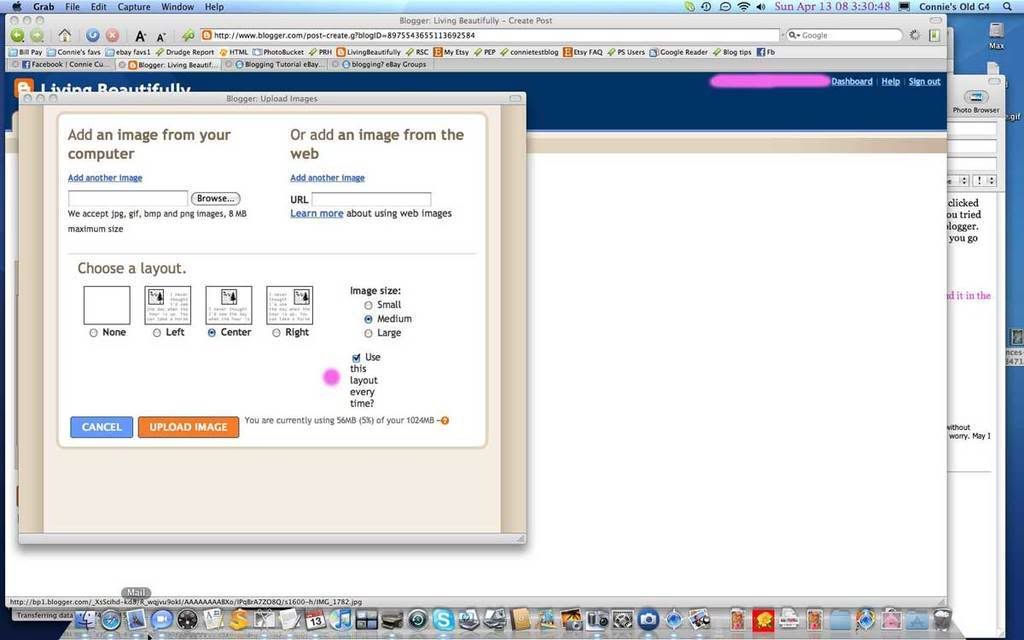
As you look at the Blogger Upload Images you can add them from your computer or from an image on the web like Photobucket using a url, which is something like this:
http://www. --------
If using a URL from the web it could be a photobucket account photo which you go to the PB and click on the photo DIRECT HTML under the photo you want. (Since flickr does NOT give you the direct html to use, you cannot use flickr for this. I use PB as an image host so I'm very familiar with it.) Click command copy and paste and then add it to the URL on the right side of the picture.I would make it about 500 px wide and do it proportionately wide with the length so both sides will be proportionate so as not to distort it. See the blue dots in the screenshot below to know where to add the photos this way.
You can make it bigger on your blog post doing it from PB. I would use only 500 or 600 wide so it will fit on the page. You really shouldn't use much bigger than that or it CAN distort your blogger template. Now, bigger ones from photobucket are definitely clickable but they will only be the size of the image you are clicking. Every single photo can be changed around. Here's the trick:
Upload all of them and then in order to change them around, click on the photo you want to move and then use the command key and the C (copy) . You have just made that picture clickable to post anywhere you want it to be. Then go to where you now want the picture to be and click command + V (paste) and that will insert it to where you've wanted it to be. Very simple. I have done this hundreds of times and it does work. If you have any questions, you may email me from my blog Profile Page where my email is. (I just try to make it a little harder for the scammers and spammers.)
If adding directly from your computer then you would use the red dot "Add an image from your computer" on the left side.
No matter which way you add your pictures to the blog post, to change or rearrange them is EXACTLY the same way.
Screenshot #14
There are a couple of other things I didn't put in earlier that are definitely worth mentioning.
As you look at the Blogger Upload Images you can add them from your computer or from an image on the web like Photobucket using a url, which is something like this:
http://www. --------
If using a URL from the web it could be a photobucket account photo which you go to the PB and click on the photo DIRECT HTML under the photo you want. (Since flickr does NOT give you the direct html to use, you cannot use flickr for this. I use PB as an image host so I'm very familiar with it.) Click command copy and paste and then add it to the URL on the right side of the picture.I would make it about 500 px wide and do it proportionately wide with the length so both sides will be proportionate so as not to distort it. See the blue dots in the screenshot below to know where to add the photos this way.
You can make it bigger on your blog post doing it from PB. I would use only 500 or 600 wide so it will fit on the page. You really shouldn't use much bigger than that or it CAN distort your blogger template. Now, bigger ones from photobucket are definitely clickable but they will only be the size of the image you are clicking. Every single photo can be changed around. Here's the trick:
Upload all of them and then in order to change them around, click on the photo you want to move and then use the command key and the C (copy) . You have just made that picture clickable to post anywhere you want it to be. Then go to where you now want the picture to be and click command + V (paste) and that will insert it to where you've wanted it to be. Very simple. I have done this hundreds of times and it does work. If you have any questions, you may email me from my blog Profile Page where my email is. (I just try to make it a little harder for the scammers and spammers.)
If adding directly from your computer then you would use the red dot "Add an image from your computer" on the left side.
No matter which way you add your pictures to the blog post, to change or rearrange them is EXACTLY the same way.
Screenshot #14
~*~
Update 8/27/2009
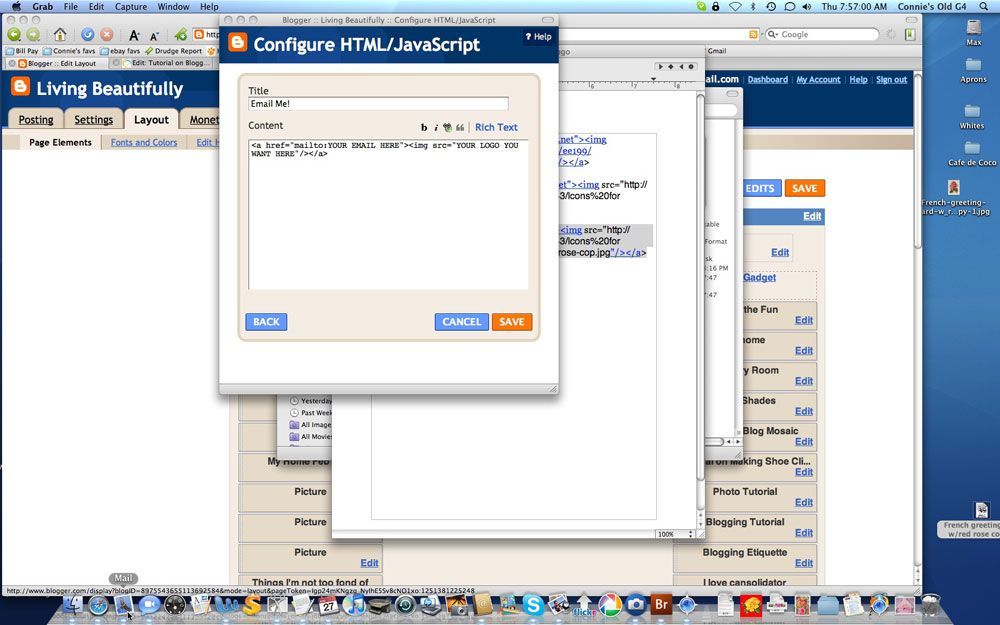
This is how you will add your email address to your side bar of your blog. Click on "Customize", the select "Configure HTML/JavaScript", then give it a Title such as "Email Me" or something they will recognize that it is your email and then add exactly what you see in the screenshot #15 below. However, you will put in YOUR email address exactly as you see it below (I have it in caps for you) and then your image from Photobucket that is your "Direct Link" and begins with HTTP (That is also in caps for you). That is what you'll need the one that has the HTTP below the picture. You would do this with whatever image host you use.
Screen shot #15
~*~
Update 9/10/2009
I wish to bring something up that is very important and most of you probably don't think about or maybe even know about.
When you leave a comment and the person you are leaving the comment for is notified it is usually a "noreply-comment@blogger.com" with your name in the address field of the email sent to you by blogger to notify you a comment has been left. Sometimes there is a question for me and I have to seek out your blog to answer it. While going to your blog is not a problem as I love visiting your blogs and leaving comments, I'd prefer to respond to some things privately and if your email address isn't there I can't do that. So here is what you can do to assure that if you'd like. It's a pretty basic and easy tutorial for those who wish to learn about blogging. The blogs are ever changing though so I keep updating it as concerns appear or are asked of me to explain to someone. This is only if you want to, but trust me it is much easier to reply to someone when their email address shows up. I have several emails so this is not a problem for me. Do as you wish though.
To remedy this situation do this:
Go to your settings. It can be done by clicking on New Post from your blog and the screen below will show up. (I've blotted out privacy things that might jeopardize my security.)
Screenshot #16
~*~
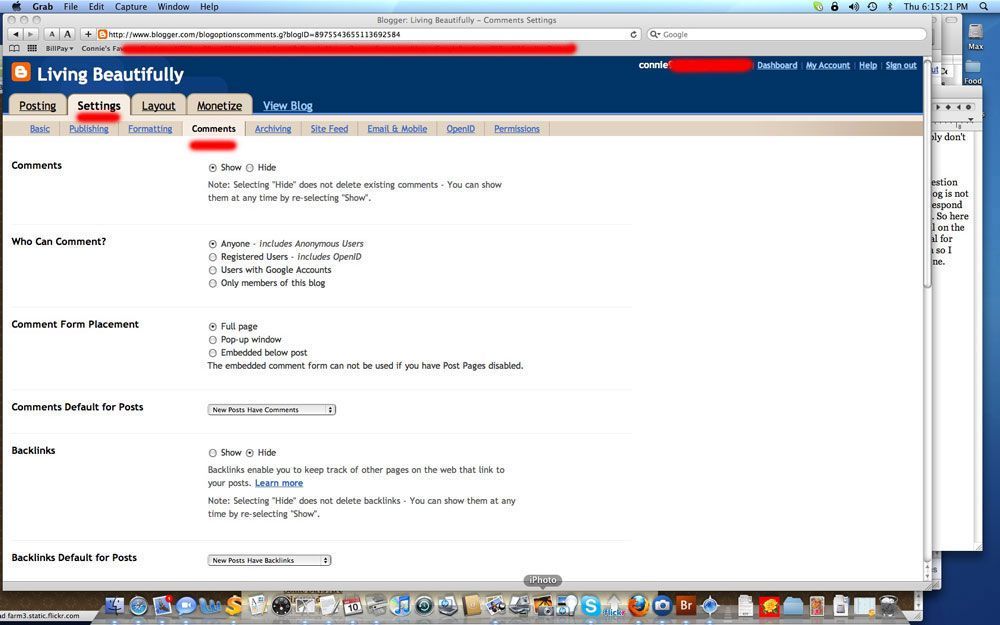
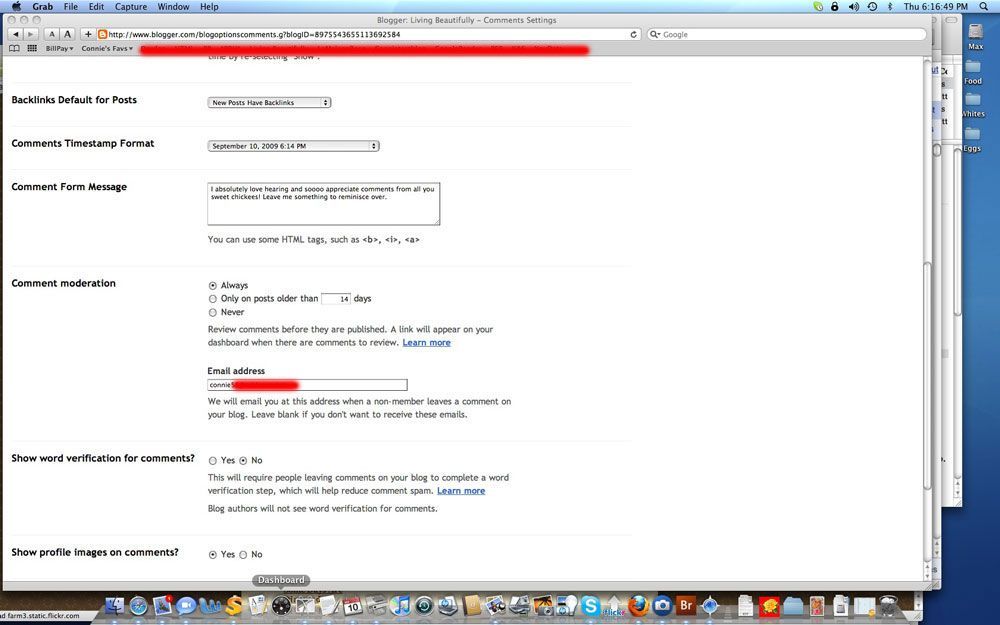
Go to your Settings in blogger. Then go to Comments. See pix below. A continuation of that site is below on Screenshot #18 as I could not get it all on one screenshot.
Screenshot #17
Screenshot #17
Put your address where it says "Comment Moderation" and Email address. Be sure and click "SAVE SETTINGS" at the bottom of the page and you are all set.
Screenshot #18
Screenshot #18
~*~
Update 10/26/2009
Some bloggers have been emailing me and asking how to add your logo and HTML button to the sidebar so others can just snag it to put on their sidebar to direct more bloggers to their blog. You will put in your own information where it is in color - lavender. You will use the DIRECT LINK under your Photobucket photo to put in the colored area that says Photobucket. You will use your Blog URL (http://WHATEVER IT IS IN HERE) to put in where it says YOUR BLOG URL. Here is the HTML you would use:

You will do this under Customize and using the HTML/JavaScript gadget for this. It is not as hard as you may think. As always, be sure and click "Save" or it is all for naught! If you have any questions or help is needed, just email me from my blog and I'll help you get it correct.
~*~
Some bloggers have been emailing me and asking how to add your logo and HTML button to the sidebar so others can just snag it to put on their sidebar to direct more bloggers to their blog. You will put in your own information where it is in color - lavender. You will use the DIRECT LINK under your Photobucket photo to put in the colored area that says Photobucket. You will use your Blog URL (http://WHATEVER IT IS IN HERE) to put in where it says YOUR BLOG URL. Here is the HTML you would use:
You will do this under Customize and using the HTML/JavaScript gadget for this. It is not as hard as you may think. As always, be sure and click "Save" or it is all for naught! If you have any questions or help is needed, just email me from my blog and I'll help you get it correct.
~*~
Update 11/13/2009
The question has come up about the size of photos on blogs. This issue has a lot, if not ALL, to do with the template you choose. Probably the most common template on the blogs that I visit is the Minima one. There are also the Rounders and Scribe that have a small popularity but Minima and Minima Stretch are the most popular by far. Some bloggers prefer their own template and that will not apply to whatever I refer to here. I recently changed from Minima that I had tweaked to be a three column to Minima Stretch because I wanted bigger photos so that they can be seen better without the inevitable "clicking to enlarge" or, in other words, I had my visitor in mind when posting my blog photos. I also wanted as much usable space as I could get noticing that there was a lot of space on the sides that wasn't getting used. I also wanted a "clean" looking blog. I love graphics but there is a limit even for me. In saying this, please understand I blog solely for ME but I do consider others when they will be visiting me. After all, we do want visitors and want them to navigate our blogs easily.
Templates will usually "expand" to accommodate photos, but they can only expand so much without throwing off the template or photo. On the Minima I would add them directly from my computer and have my blog picture set for all of them to be "Large" when uploading them. Then a few times I loaded them from Photobucket but the photos were cut off on the sides usually. I edit my photos on my iPhoto and then PhotoShop them for size never, ever exceeding 750 pixels wide proportionately on my PhotoShop. (This can be done also in Paint Pro, etc.) But I'm finding now that 750 is just too wide for even the stretch as the photo is huge. So for me I've decided to usually put in a photo now that is 500—600 pixels wide. That shows nice and large for the viewer.
That being said, it makes a huge difference as to whether you upload them directly from your computer or upload from your Photobucket. I let PB work for me. I load them all into one of my albums in PB and then add them to the blog from there. You can see the difference in how to do this when you click your "add photo" on the blog. (See screenshot #12 for clarification. I have mine now set for Large.) (Oh, I'm only referring to Blogger here and not Typepad.) This also makes the photos appear larger than when I load them directly from my computer. I don't know why it is like this but it is.
A template can only expand so much before something suffers: your photo or your text. How YOU see it is not all the time how others see it. For example, if you are using a fancy text such as Edwardian Script on your blog because you like it and you want to see it, that does NOT mean that other bloggers can see the fancy script. If they don't have that font on their computer they will see the default font which is usually a very plain font like Georgia, which is what I selected for this tutorial, or a font like Verdana, Times or Courier, which is installed on just about every single computer in the world. Plus, if you're using Edwardian Script, which is a very small font and for others to see it you'd have to have the font size set at 24-30 size, they will see the default font at that size you've set it to appear but it will be HUGE on their computer! HUGE!! So keep that in mind when you're downloading a fancy font from someplace on the internet.
So I recommend you try both ways of adding your photos and experiment for what suits your style and sensitivities. BUT, and this is a huge BUT, always save your current template just in case things go awry. You'll never be sorry you saved it but you'll be very sorry if you didn't!
~*~
Update 1/8/2010
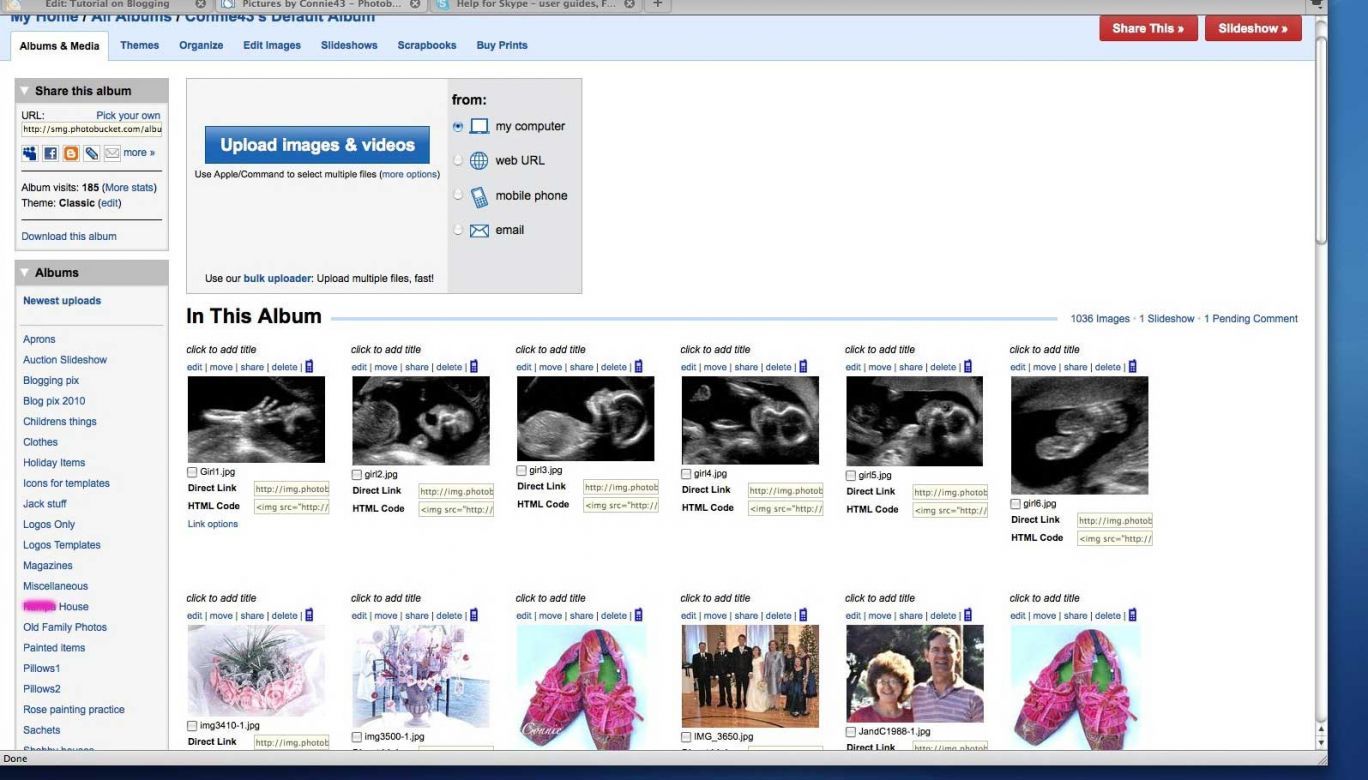
Let's talk about watermarks for your photos. It's easy with Photobucket. Get a PB account free. I suggest you add albums to PB. I have mine labeled: Blog pix, Home, Pillows, Icons, Family photos, Painted items, templates, Rose painting practice, etc. I put photos applicable into each album. You will have an "Default" album and all the other albums. I recommend albums. It's easier to control your photos.
To not be afraid of the photos; that is my new great grandchild's ultrasound. It's a girl due on 5/26/2010. ;-)
Screenshot #19
~*~
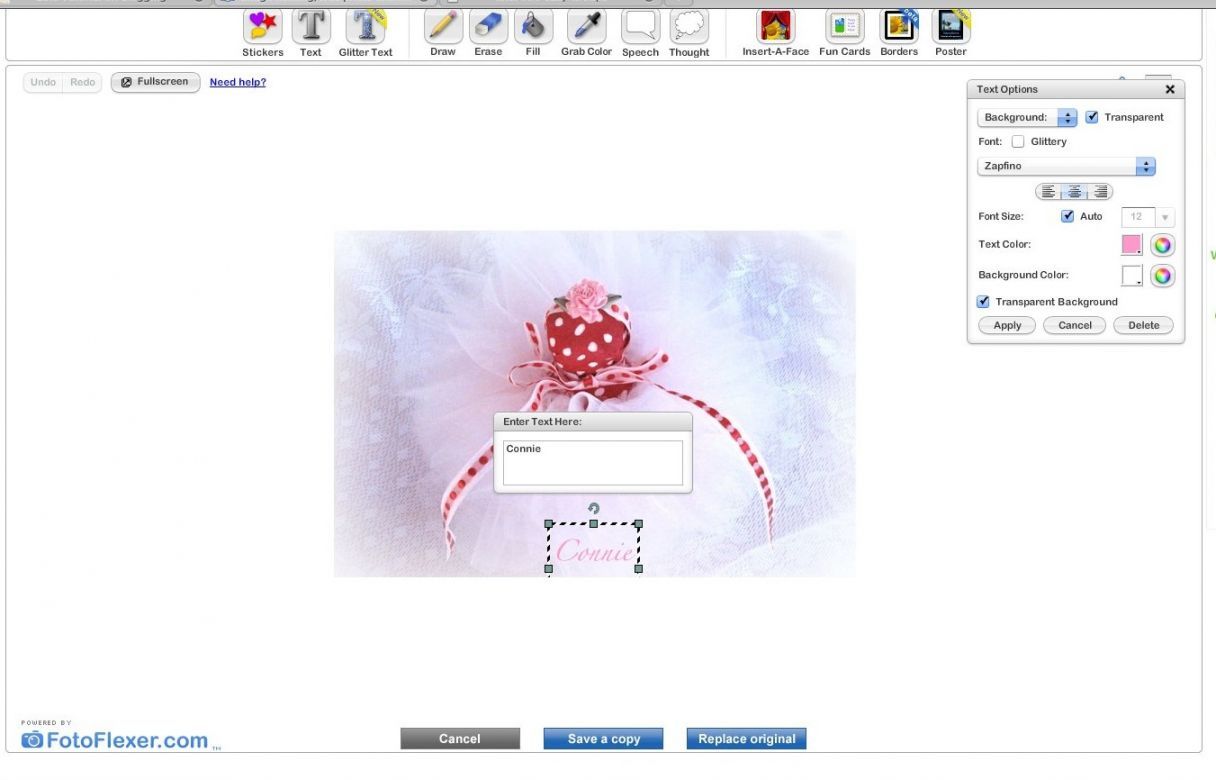
Okay, now to put the watermark on it, you would click "edit" on the photo you want to watermark.
Screenshot #20
Screenshot #20
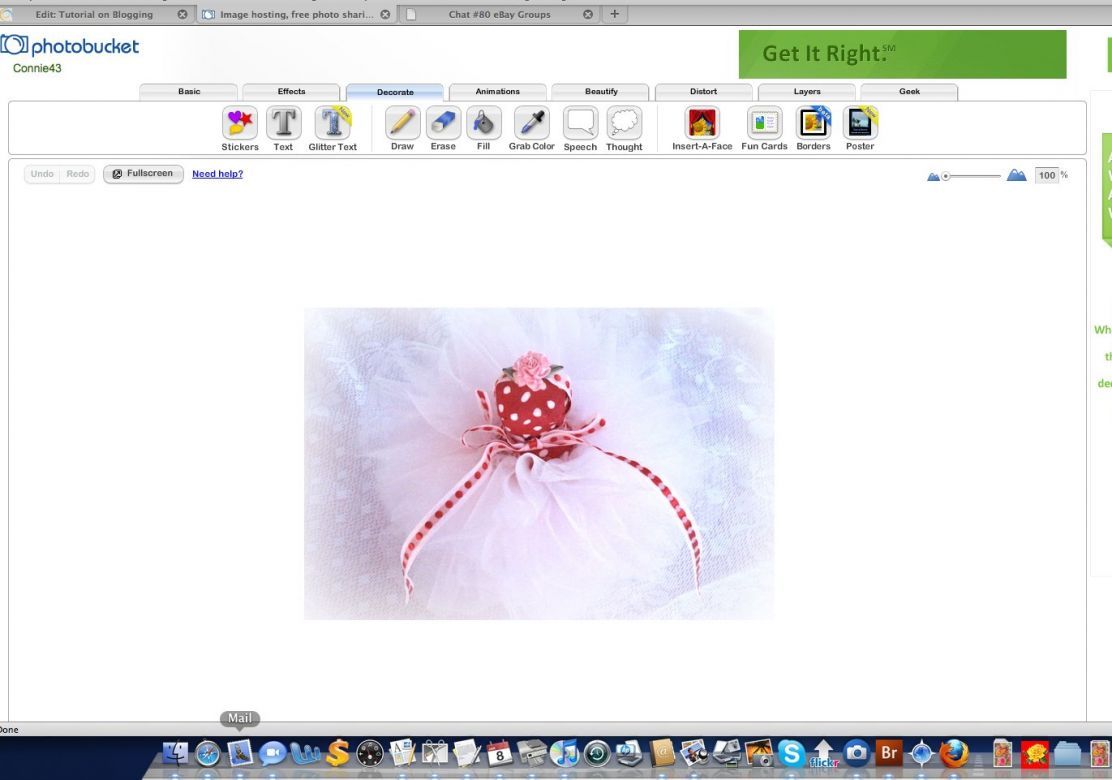
Look at the above photo and see where I clicked on "Decorate", that is where you want to be at this point.
Now, see the photo below? You want to click on "Text"—second from the left.
Now, see the photo below? You want to click on "Text"—second from the left.
Screenshot #21
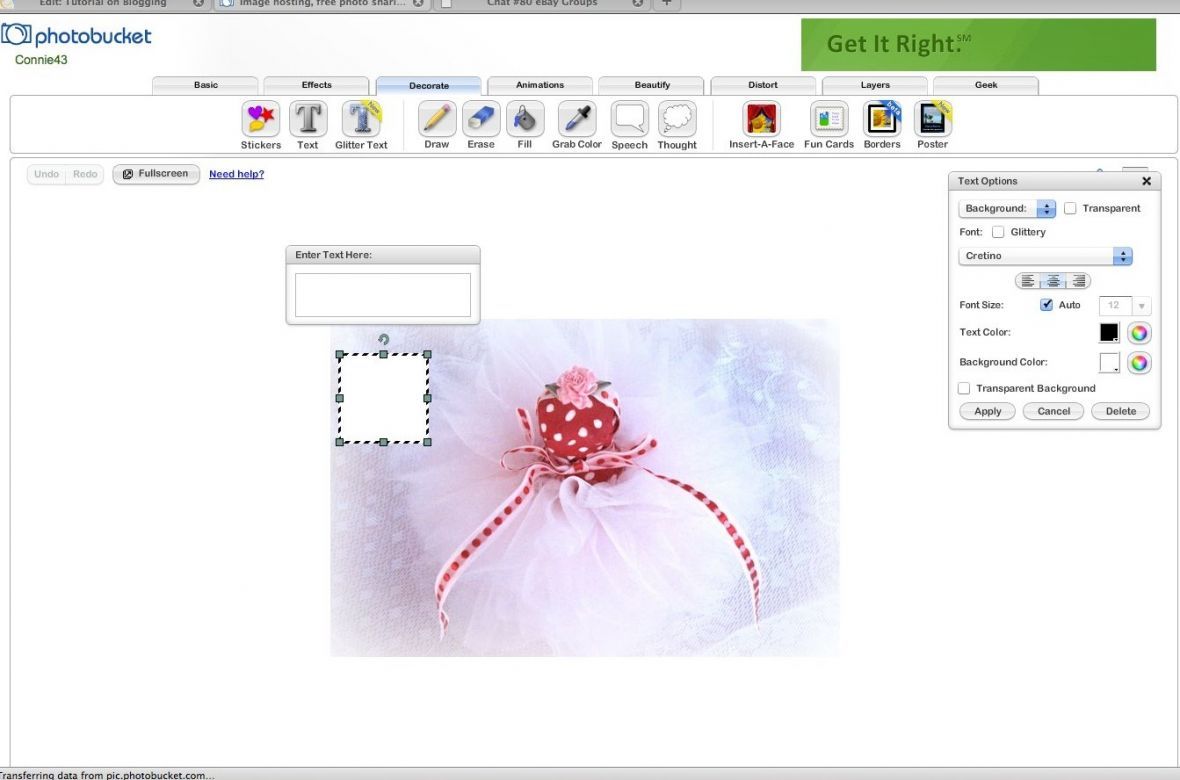
A little "text" box will appear and you can put your name, blog name or whatever you want it that little text box. The box can be dragged around so you can put it wherever you want. Notice on the right hand side you can select a font and a font size. I let it select the size automatically. I also make the background transparent. I selected a color that you could see, but I can select the lightest color which would be white and not as obtrusive. Notice also at the bottom you have 3 options: Cancel, Save a Copy, or Replace original. I always click to "Save a copy". You just never know what can happen and I take absolutely no chances. That way you will have the original and a copy with the watermark on it. Click on whichever you want and voilà, it's done. Then just return to the album you have it in. Very easy. So now you know how you can get a watermark without buying any expensive software.
Screenshot #22
~*~
Update 3/13/2010
First of all, let's talk about templates for your blog.
There has been much discussion around the blogs—especially the ones I visit frequently, which are mostly home decorating, crafting and froufrou-y types of blogs. A lot of bloggers switch templates with the seasons or simply just when their fancy decides it's time. Certainly you can do what you want, but if you are switching frequently you're not going to be as easily recognizable by people who stop by infrequently. Again, your choice. Personally, I want my blog to be recognizable and to not be just like most other blogs. I want mine to be unique. This can be achieved with just a bit of tweaking or paying someone to do it for you. I believe it is definitely worth the effort and those designers deserve to be paid. But I've seen text on some blogs that you cannot even read because it goes off the sides of the actual blog. That looks very amateurish and frankly, not very pretty. Most templates available for free from people who design pretty much generic graphics and such are usually suitable for one type of template only. Switch it to another one and it's can be pretty much unrecognizable then.
The other thing I frequently see is the switching, not just different graphics, but the whole style, say from Minima 2 column to Minima 3 columns to Minima Stretch, Rounders, Thisaway or Scribe template to name just a few, which seem to be the main types of templates I've seen. You CANNOT switch to some without major problems. It's just going to cause you grief. I've dealt with many bloggers who ask me for help so I can guarantee you I know of what I am speaking about here. Going from Minima 3 columns to a Stretch one will frustrate you to no end. So be careful what you do. Most likely, you'll lose some sidebar gadgets you've put on there. Also, if you want very large photos on your template you won't get them on Minima 2 or 3 columns. You can get bigger ones on Minima Stretch however. Your template can only expand so much so I see bloggers who've tried to put humongous photos on there and 1/3 of it doesn't even show.
A few other things have come up in recent weeks that need addressing also and that's photos—how big you can make them on different templates (which is another issue I'll address here) and inserting them.
The screenshot below is a view of what you see when you use the "old editor", which is the one I use. But let's take this slowly so I can explain some things.
Photos. I like the largest I can get without scrolling. I changed from a Minima 3 column template to a Minima Stretch to achieve that. I experimented and found the best for my blog is 750 pixels wide. Shows nice and large to see details in the photos I want details to show. Now, how do I do that? The secret is how you upload them also. Screenshot #23 shows the "old editor" and uploading pictures to it.
My sequence of making a blog post is this:
1. Take photos.
*
2. Upload photos to my computer, which is an Apple iMac so the desktop will look a bit different from yours. (I've oblitered some things with red to preserve privacy.)
I edit them with iPhoto and PhotoShop Elements to 750 px wide. There are other programs available to regular PC users but this is what I like and am familiar with the most.
*
3. I then upload them to Photobucket which is free or you can get a paid subscription for $25 a year and that way you get NO ADS and more storage. I figure it's a small price to pay for more storage and no ads.
*
4. I then go to Blogger and click for "New Post". Uploading my photos is the very first thing I do. I then add the text to the blog.
*
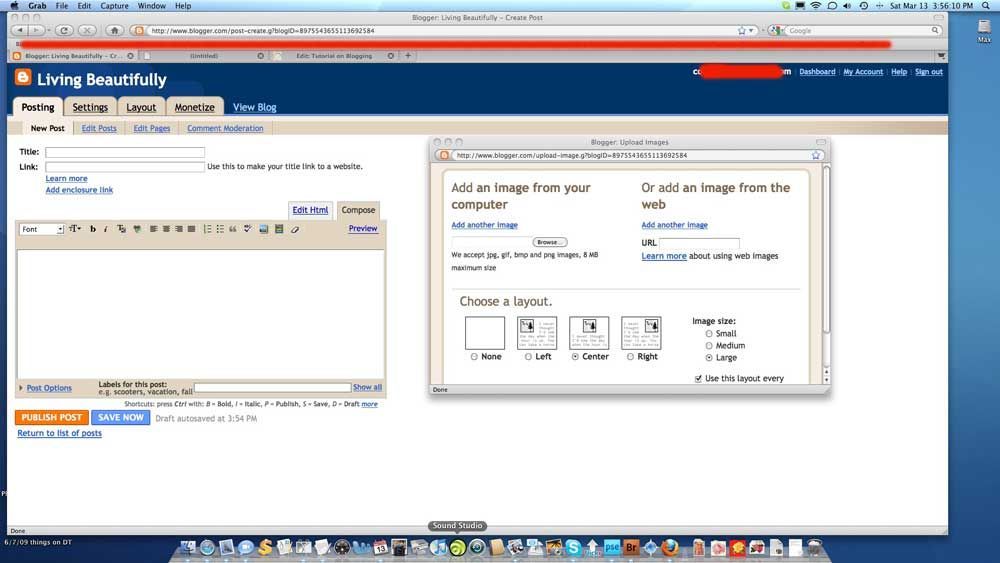
Okay, that's the sequence, but let's go back go uploading them to my blog. Screenshot #23 shows you exactly what you'd see if using the "old editor." I then add them via the "Or add an image from the web" on the right hand side of the screenshot. I usually have several photos so I add them 5 at a time, which is the maximum number of photos you can load at one time. It is much quicker to upload from this one than the one on the left. I've also noticed that they are bigger when uploading them this way. Of course, I always have the little dot on the bottom right hand side set to "Large" and to "Use this layout every time" and it saves time. You can certainly use the left side to upload from your computer and then these are clickable to the original size and frequently I see them so large when clicked that it takes longer for them to appear because the person didn't change how big in megabytes or pixels they are. Usually they're huge. The advantage is they are clickable to be view larger, which I thoroughly enjoy but the disadvantage is they have to be clicked. I want to make it easy for the viewer. I make them large enough—by using the right side and downloading from Photobucket—to satisfy the need right then and there, not waiting to be clicked. I can keep the viewer on the same page. I think most people appreciate that.
First of all, let's talk about templates for your blog.
There has been much discussion around the blogs—especially the ones I visit frequently, which are mostly home decorating, crafting and froufrou-y types of blogs. A lot of bloggers switch templates with the seasons or simply just when their fancy decides it's time. Certainly you can do what you want, but if you are switching frequently you're not going to be as easily recognizable by people who stop by infrequently. Again, your choice. Personally, I want my blog to be recognizable and to not be just like most other blogs. I want mine to be unique. This can be achieved with just a bit of tweaking or paying someone to do it for you. I believe it is definitely worth the effort and those designers deserve to be paid. But I've seen text on some blogs that you cannot even read because it goes off the sides of the actual blog. That looks very amateurish and frankly, not very pretty. Most templates available for free from people who design pretty much generic graphics and such are usually suitable for one type of template only. Switch it to another one and it's can be pretty much unrecognizable then.
The other thing I frequently see is the switching, not just different graphics, but the whole style, say from Minima 2 column to Minima 3 columns to Minima Stretch, Rounders, Thisaway or Scribe template to name just a few, which seem to be the main types of templates I've seen. You CANNOT switch to some without major problems. It's just going to cause you grief. I've dealt with many bloggers who ask me for help so I can guarantee you I know of what I am speaking about here. Going from Minima 3 columns to a Stretch one will frustrate you to no end. So be careful what you do. Most likely, you'll lose some sidebar gadgets you've put on there. Also, if you want very large photos on your template you won't get them on Minima 2 or 3 columns. You can get bigger ones on Minima Stretch however. Your template can only expand so much so I see bloggers who've tried to put humongous photos on there and 1/3 of it doesn't even show.
A few other things have come up in recent weeks that need addressing also and that's photos—how big you can make them on different templates (which is another issue I'll address here) and inserting them.
The screenshot below is a view of what you see when you use the "old editor", which is the one I use. But let's take this slowly so I can explain some things.
Photos. I like the largest I can get without scrolling. I changed from a Minima 3 column template to a Minima Stretch to achieve that. I experimented and found the best for my blog is 750 pixels wide. Shows nice and large to see details in the photos I want details to show. Now, how do I do that? The secret is how you upload them also. Screenshot #23 shows the "old editor" and uploading pictures to it.
My sequence of making a blog post is this:
1. Take photos.
*
2. Upload photos to my computer, which is an Apple iMac so the desktop will look a bit different from yours. (I've oblitered some things with red to preserve privacy.)
I edit them with iPhoto and PhotoShop Elements to 750 px wide. There are other programs available to regular PC users but this is what I like and am familiar with the most.
*
3. I then upload them to Photobucket which is free or you can get a paid subscription for $25 a year and that way you get NO ADS and more storage. I figure it's a small price to pay for more storage and no ads.
*
4. I then go to Blogger and click for "New Post". Uploading my photos is the very first thing I do. I then add the text to the blog.
*
Okay, that's the sequence, but let's go back go uploading them to my blog. Screenshot #23 shows you exactly what you'd see if using the "old editor." I then add them via the "Or add an image from the web" on the right hand side of the screenshot. I usually have several photos so I add them 5 at a time, which is the maximum number of photos you can load at one time. It is much quicker to upload from this one than the one on the left. I've also noticed that they are bigger when uploading them this way. Of course, I always have the little dot on the bottom right hand side set to "Large" and to "Use this layout every time" and it saves time. You can certainly use the left side to upload from your computer and then these are clickable to the original size and frequently I see them so large when clicked that it takes longer for them to appear because the person didn't change how big in megabytes or pixels they are. Usually they're huge. The advantage is they are clickable to be view larger, which I thoroughly enjoy but the disadvantage is they have to be clicked. I want to make it easy for the viewer. I make them large enough—by using the right side and downloading from Photobucket—to satisfy the need right then and there, not waiting to be clicked. I can keep the viewer on the same page. I think most people appreciate that.
Screenshot #23
This is what you would see if using the "new editor." You put in only one URL/Photo at a time but you can quickly do them one right after the other. I don't like it this way. However, it is your choice, of course, if you like this one better. But I don't have as much control over the photos after they are uploaded this way. I may be doing something wrong but I've tried and tried to no avail and several other bloggers have confirmed this also.
Screenshot #24

This screenshot is the Preview with the "new editor." It's a very small window to preview it and doesn't give me the "real" picture.
Screenshot #25

This screenshot is what you see when you preview it in the "old editor." Personally, I like it much, much better.
Screenshot #26
Of course you can do what you want; it's up to you. However, if you want your blog to be recognizable, unique and great photos for others to view, then take heed. Make it beautiful not just for them but for you also. And please contact me if you have any questions about this tutorial that doesn't make sense to you. I'm happy to help you if I can.
~*~
Updated 6/30/2010
There has been another problem crop up with the advent of the new "Design" feature on blogger. The first thing I want to warn you against as I have several bloggers email me for help in this area recently as they were "playing around" and obliterated their templates. If you are even considering changing your template to one of the new ones, YOU NEED TO SAVE YOUR OLD TEMPLATE!! YES. SAVE. IT! If you don't, you will loose it forever and may not get it back as the old ones aren't easily available: Minima, Minima Stretch, etc. You should know how to save your template at this point because I'm sure it's above somewhere. SAVE YOUR TEMPLATE IN A SAFE PLACE BY COPYING AND PASTING IT!!! Is that clear enough? You have been warned!
*
And the second thing I'll bring up and that has just changed is the new Preview window when creating a new post. With the OLD editor it was a full page view, but with the NEW editor, which I see many people using, and trust me I can tell. (There are huge "gaps" between pictures and text.) That right there tells me what editor they are using. So, in their infinite wisdom, the creators of Blogger have changed the Preview from a tiny window to a full page Preview and I like that. It gives you a much better idea of what your blog post will look like. Much easier to read.
Screenshot #27
Okay, chicks, I'm going to save your "bacon" here. If you want to go back to the old templates, you sure can. Just click and go here for OLD TEMPLATES and you'll find them. You're very welcome! ;-)
*
In a recent post I stated something about blogs that have all the favorites of the blogger on the sidebar and some go on forever. Well, after that I saw one that actually went on for hundreds of favorites. I can't remember whose it was and wouldn't say even if I could so as not to embarrass her or him. I don't think I've ever seen so many. I think it was on their Profile page though. My goodness, that blogger had a lot.
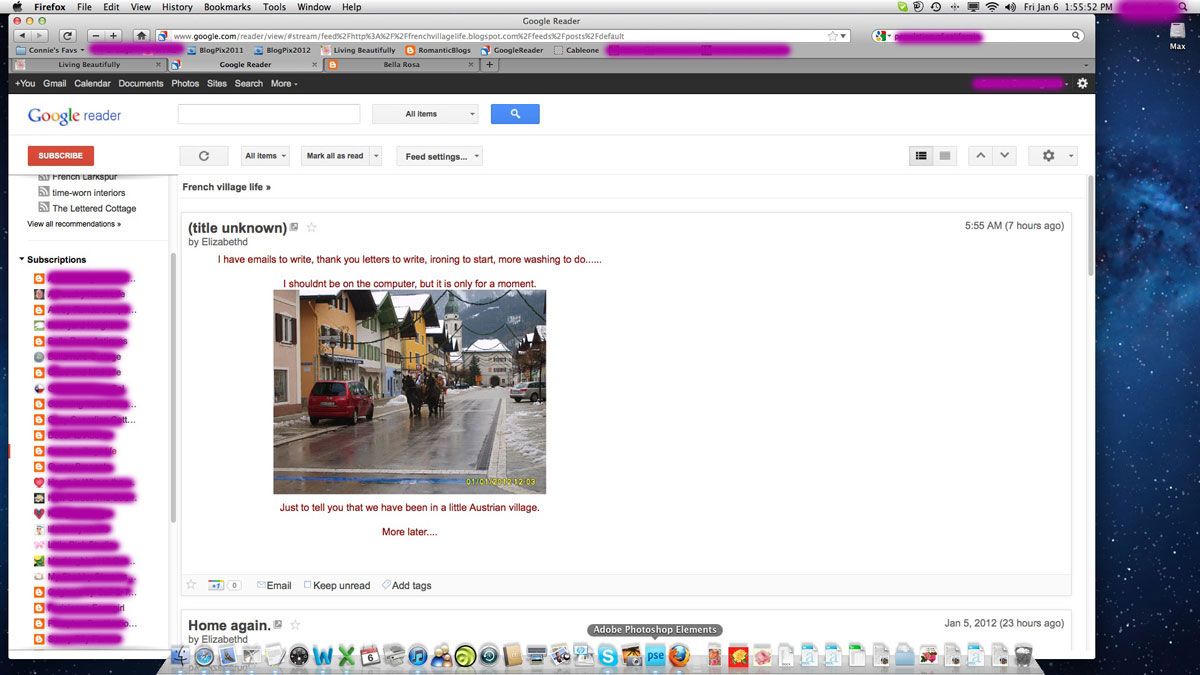
Anyway, I received an email from someone saying that is how she can keep up with all of them and when they're been updated. It didn't occur to me that some of you didn't know the alternatives to have a Blog List on Google Reader. Yes!! You don't have to have them all on your sidebar. I actually prefer Google Reader. Anyway, I'm showing you how you can do it without having your scroll bar so tiny you can barely see it when you have so many things on your sidebar. I'm not meaning to embarrass anyone or be mean but just to show you there are alternatives.
I'm done a screenshot of my desktop to show you how I view all my favorites. There could be many more as I do hop around but I've had to limit it to just a few who inspire me, whether creatively, emotionally or spiritually. I've also Photoshopped the screenshot so as to not make anyone feel bad if they're not on it. Plus, I like privacy. Yes, I know that's hard to believe with some of the things I post on here but there are certain privacy issues to which I prefer to adhere. Having been burglarized twice in California (once even walking in on them and being threatened with a screwdriver) and having once been burglarized here in Idaho. Actually, I don't think I've ever mention Love Bunny's name on here, but I do so in emails to people. It's all about privacy.
So, google Google Reader and create your own page and start putting your subscriptions in there. It will take a while if you have a few hundred but it's well worth the effort in my opinion. And, please, pass the word around. You may use my screenshots if you'd like. Just drag them to your desktop. (Mine looks a bit different because I'm on Apple Macs.) Or send your friends to this post. I'll also put it in my tutorial up at the top so it will be visible to anyone.
Oh, and those in the top left corner are ones that Google "advertises" and you could be in there for other people to see also. Those aren't ones I necessarily subscribe to.
~*~
~*~
Updated 6/30/2010
There has been another problem crop up with the advent of the new "Design" feature on blogger. The first thing I want to warn you against as I have several bloggers email me for help in this area recently as they were "playing around" and obliterated their templates. If you are even considering changing your template to one of the new ones, YOU NEED TO SAVE YOUR OLD TEMPLATE!! YES. SAVE. IT! If you don't, you will loose it forever and may not get it back as the old ones aren't easily available: Minima, Minima Stretch, etc. You should know how to save your template at this point because I'm sure it's above somewhere. SAVE YOUR TEMPLATE IN A SAFE PLACE BY COPYING AND PASTING IT!!! Is that clear enough? You have been warned!
*
And the second thing I'll bring up and that has just changed is the new Preview window when creating a new post. With the OLD editor it was a full page view, but with the NEW editor, which I see many people using, and trust me I can tell. (There are huge "gaps" between pictures and text.) That right there tells me what editor they are using. So, in their infinite wisdom, the creators of Blogger have changed the Preview from a tiny window to a full page Preview and I like that. It gives you a much better idea of what your blog post will look like. Much easier to read.
Screenshot #27
Okay, chicks, I'm going to save your "bacon" here. If you want to go back to the old templates, you sure can. Just click and go here for OLD TEMPLATES and you'll find them. You're very welcome! ;-)
*
In a recent post I stated something about blogs that have all the favorites of the blogger on the sidebar and some go on forever. Well, after that I saw one that actually went on for hundreds of favorites. I can't remember whose it was and wouldn't say even if I could so as not to embarrass her or him. I don't think I've ever seen so many. I think it was on their Profile page though. My goodness, that blogger had a lot.
Anyway, I received an email from someone saying that is how she can keep up with all of them and when they're been updated. It didn't occur to me that some of you didn't know the alternatives to have a Blog List on Google Reader. Yes!! You don't have to have them all on your sidebar. I actually prefer Google Reader. Anyway, I'm showing you how you can do it without having your scroll bar so tiny you can barely see it when you have so many things on your sidebar. I'm not meaning to embarrass anyone or be mean but just to show you there are alternatives.
I'm done a screenshot of my desktop to show you how I view all my favorites. There could be many more as I do hop around but I've had to limit it to just a few who inspire me, whether creatively, emotionally or spiritually. I've also Photoshopped the screenshot so as to not make anyone feel bad if they're not on it. Plus, I like privacy. Yes, I know that's hard to believe with some of the things I post on here but there are certain privacy issues to which I prefer to adhere. Having been burglarized twice in California (once even walking in on them and being threatened with a screwdriver) and having once been burglarized here in Idaho. Actually, I don't think I've ever mention Love Bunny's name on here, but I do so in emails to people. It's all about privacy.
So, google Google Reader and create your own page and start putting your subscriptions in there. It will take a while if you have a few hundred but it's well worth the effort in my opinion. And, please, pass the word around. You may use my screenshots if you'd like. Just drag them to your desktop. (Mine looks a bit different because I'm on Apple Macs.) Or send your friends to this post. I'll also put it in my tutorial up at the top so it will be visible to anyone.
Oh, and those in the top left corner are ones that Google "advertises" and you could be in there for other people to see also. Those aren't ones I necessarily subscribe to.
~*~


